


How To Safely Roll Back Your NVIDIA Graphics Drivers Without Breaking Anything
By selma čitakovićon 01/26/2026 |
Are the latest NVIDIA graphics drivers giving you trouble? If you're experiencing black screens, artifacts, and games crashing right after installing them, it might be time to roll back. Unfortunately, it's not that unusual for NVIDIA to miss the mark with some updates. Now, you may think of using Device Manager to roll back, but I don't recommend it. It doesn't work that well for NVIDIA drivers, since it won't completely remove all components, which might lead to some conflicts down the road. Moreover, the "Roll Back Driver" option is grayed out half the time. It won't work if Windows hasn't saved the previous driver version.
Here's what you should do instead: get the older drivers from the official website, remove the problematic ones with Display Driver Uninstaller, and then clean-install the version you want to roll back to. It's safe and thorough, without nasty driver leftovers. I'll guide you through the process below.
Get older drivers from the NVIDIA website
First, you'll want to check which driver version you currently have installed.
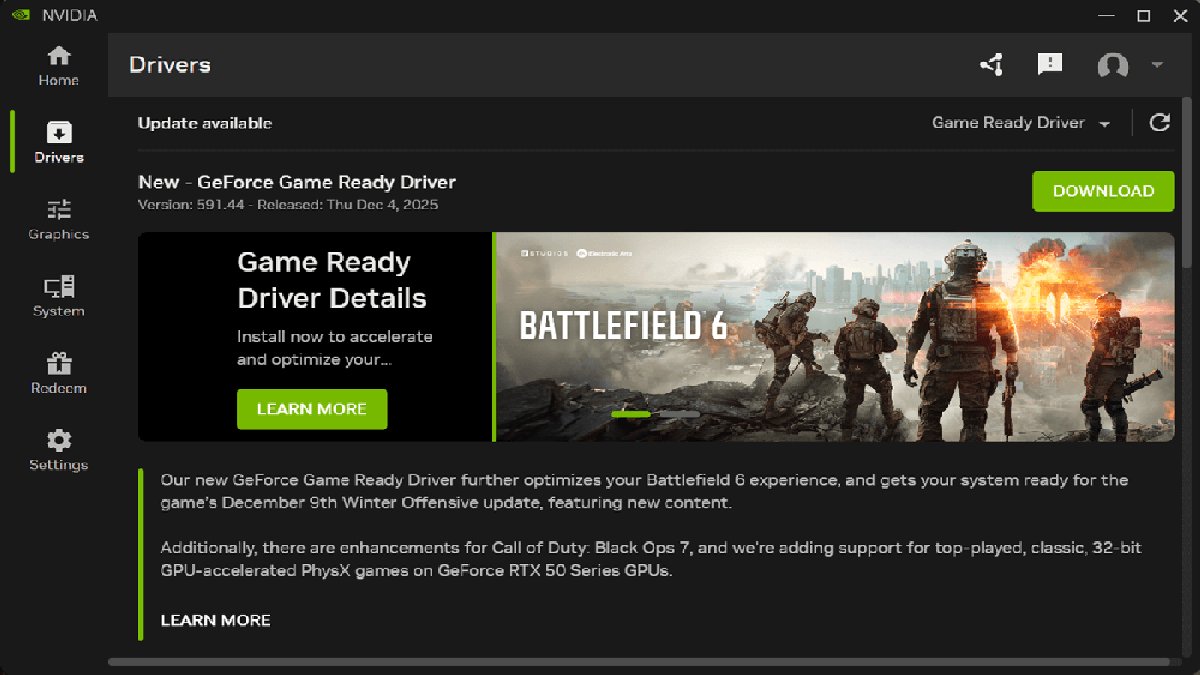
Open the NVIDIA app and click on Drivers on the left side. Scroll down, and you'll see the driver you have installed right now, together with the previous one. Mark down your current version and possibly the older one, if you want to roll back to that one specifically.
Next, you'll want to go to NVIDIA's manual driver search page. Input your GPU details, such as the series and model.
If you're unsure, you can check your System Information. Press the Windows key + R together, type in msinfo32, and press Enter. On the left side, go to Components > Display. You'll then see your NVIDIA GPU model on the right, next to Name. For example, my model is NVIDIA GeForce RTX 4070 Laptop GPU. By the way, if you're also on a laptop, make sure you pick the product series for notebooks.
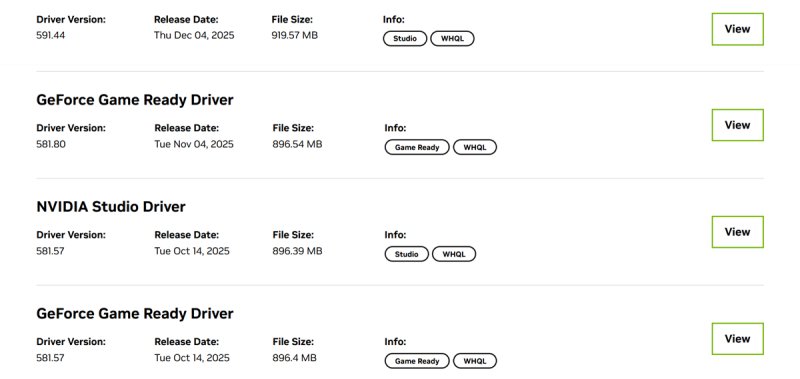
After inputting your details, you can browse relevant drivers for your device. You'll see the most recent ones at the top. Scroll down and click on View More Versions. Find the older driver you want to roll back to, and click on View, then the Download button.
Download and install Display Driver Uninstaller (DDU)
Now, it's time to get DDU. It's a driver removal tool that can help you completely remove all traces of NVIDIA/AMD graphics card drivers. It's more thorough than using the Windows Control Panel or Device Manager.
After you download it, double-click the setup.exe file to install it. When you run the program for the first time, you'll see a list of options. In the NVIDIA Specific Options section, make sure you tick everything except Keep NVIDIA Control Panel Global/Program Settings. At this point, DDU will also probably remind you that it works best in Safe mode.
Reboot into Safe mode
Safe mode is a diagnostic mode that reboots Windows with only the essential, pre-installed drivers and services. To enter it:
- Hold Shift and click the Windows Start button, then Restart.
- Keep holding the Shift key until you see a blue screen - the good kind, not a scary error one.
- Click on Troubleshoot, then Advanced options.
- Select Startup Settings, and Restart on the next screen.
- After another restart, you'll see a numbered list of options. Press 4 to enable Safe Mode.
Finally, you'll boot into a stripped-down version of Windows, which is what we want for the next step.
Deinstall NVIDIA graphics drivers with DDU
It's time to run DDU again:
- Open the app. On the right side, select the device type as GPU, and then NVIDIA.
- On the top left side, click the Clean and restart button. This option is also recommended by the app.
- Wait for it to remove all traces of previous drivers and restart.
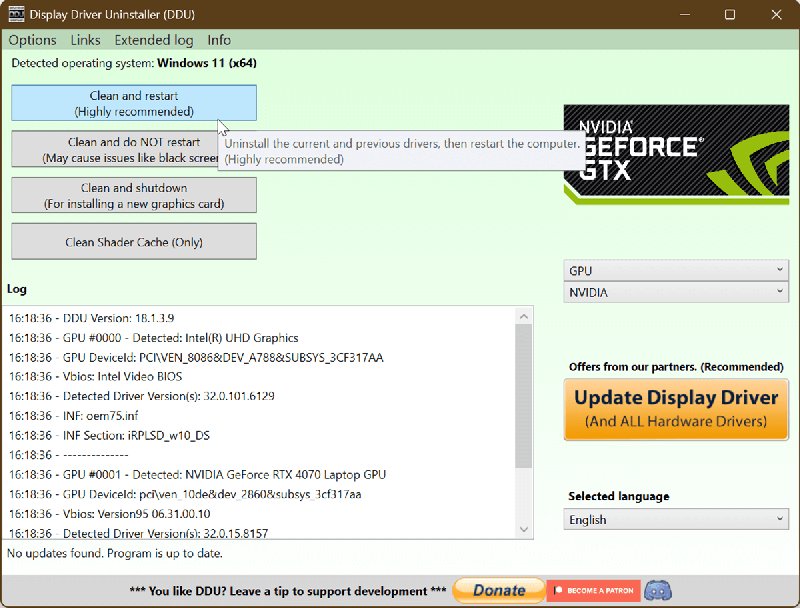
If you want to quickly check whether they're properly uninstalled, right-click your desktop and select Show more options. You'll see that the Nvidia Control Panel is no longer there. Good!
Install the previous driver version
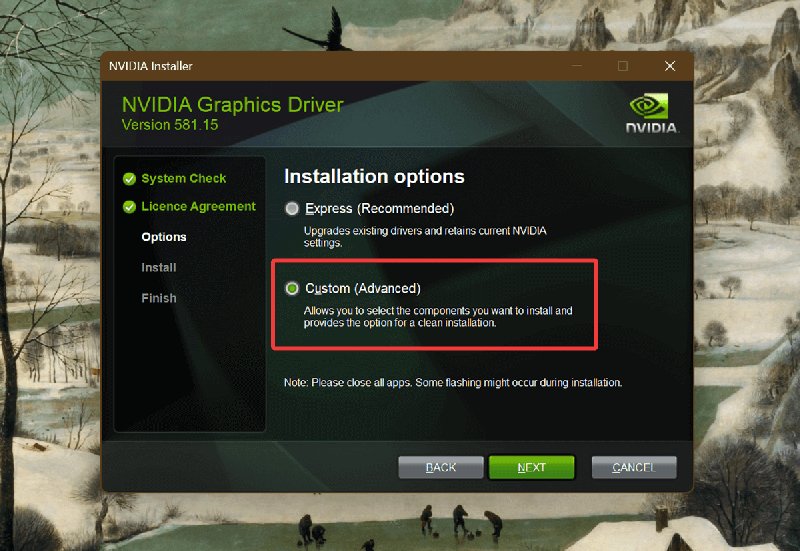
Lastly, go to your Downloads folder and install the driver you want to roll back to. The installer will ask you whether you also want to get the NVIDIA app. Since the app will keep reminding you to get the latest drivers, you can skip it if you're certain you want to stay on the older driver version. You can always get it later if you change your mind.
Make sure you click on the Custom (Advanced) install option, and tick the Perform a clean installation box. Wait for it to finish, and ta-da!
You've successfully rolled back your graphics drivers, despite Windows and NVIDIA making the process more difficult than it should be. For any future releases, it's a good idea to keep an eye on the NVIDIA community forums. Other users share their experiences (and potential issues) in feedback threads, so you can make an informed decision if you're considering updating.

|
selma citakovic
Selma is a gamer, geek and gremlin hunter with a passion for cyber security and smashing Windows bugs before they bite. She’s IBM-certified, loves real freeware, despises bloatware, and powers most of her troubleshooting with an unhealthy amount of coffee. |
comments powered by Disqus
