


How To Repair Install Windows 11, and Keep All Your Files and Apps
By selma čitakovićon 02/22/2026 |
Did you know that you can repair install Windows 11 while keeping all your apps, settings, and files? You can do it with an in-place upgrade and not lose anything in the process. It's quicker and more convenient than a clean install.
But first, you should know that you'll need at least 20 GB of free space and be signed in as an administrator to perform an in-place upgrade. If that's not an issue, let's jump right into it. It's a simple (if slightly tedious) process, with a lot of clicking on "Next" and "Accept."
I'll cover two methods, starting with the more straightforward one.
Use Windows Update to repair install Windows 11
You can simply reinstall your current OS version and keep everything via Windows Update. Here's how:
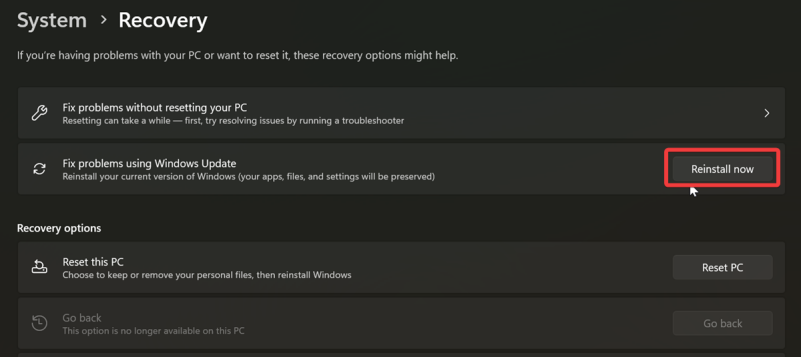
- Go to Settings > System > Recovery.
- Hit the Reinstall now button next to Fix problems using Windows Update.
- Click OK on the window that opens. It will ask you to make sure your PC is on and connected to a network and power source.
- A repair version will start downloading in Windows Update. Wait for it to finish.
- When it's done, click the Restart now button to install the repair version.
- Wait for the process to finish, and sign in to Windows.
And that's it!
Use ISO/USB Installation Media to repair install Windows 11
Alternatively, you can perform an in-place upgrade in a more roundabout way. You'll have to do some prep work first, though:
- Turn off BitLocker or Device Encryption if you're using them to encrypt your Windows drive. You can turn them back on again after the repair install.
- Temporarily disable third-party antivirus programs so they don't prevent you from completing the repair install (they like to do that).
- Make sure you download the same Windows 11 version and edition, the same language, and the same or higher build as your currently installed one. You can get an official ISO file from the Windows 11 download page, or create a bootable USB.
With that out of the way, you can proceed to the actual steps:
- Connect and open your Windows 11 USB, or if you just downloaded an ISO, right-click the file and select Mount.
- Double-click the setup.exe file.
- Click Yes if asked by UAC to allow this app to make changes to your device.
- Windows 11 Setup will start preparing. Wait for it to complete. It's usually very quick.
- Click the Change how Setup downloads updates link, and select Not right now. This will delay the download of optional updates during the repair install. It's better to leave them for later so they don't slow down your progress.
- Click Next, and Setup will check your PC and start getting things ready. Wait for it to complete.
- After that, you should see the license terms. Hit the Accept button.
- There will be another loading screen, where Setup will check if you're ready to install.
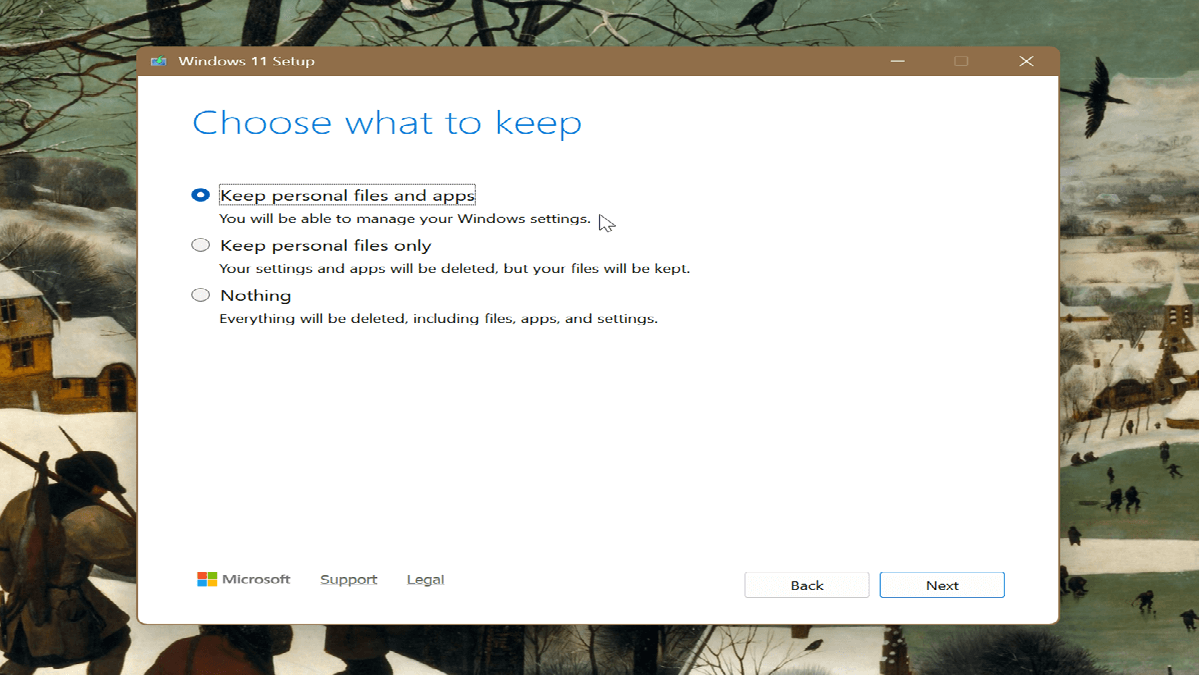
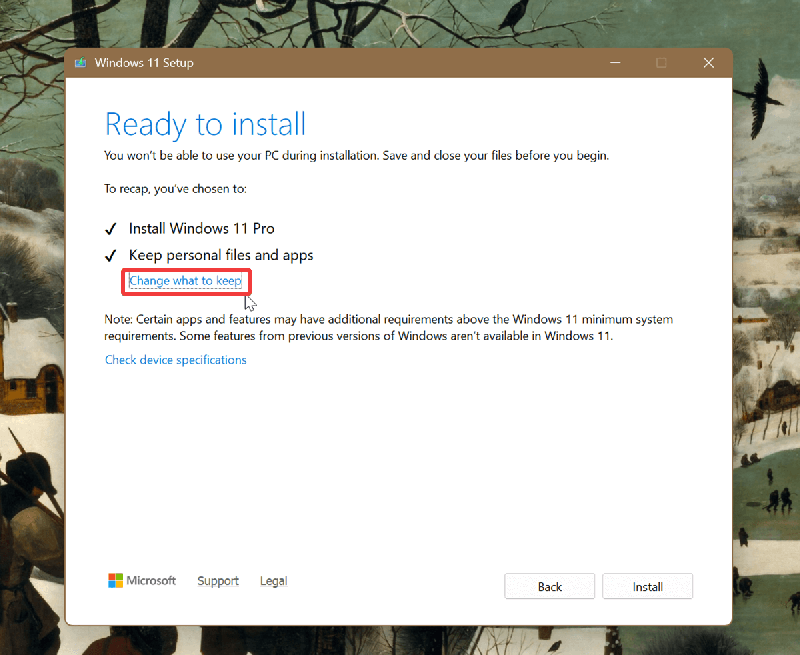
- On the Ready to install screen, click the Change what to keep link.
- Select Keep personal files and apps, and click Next.
- Finally, click Install on the Ready to install screen.
- Your PC will restart several times during the installation. Wait for it to finish.
This may take a while, so sit tight and let the repair install do its thing. When you sign back in, all your apps, settings, and personal files should be there, just like you left them.
All in all, if you're dealing with persistent Windows problems that you can't seem to fix, try doing a repair install. It might be just what you need.

|
selma citakovic
Selma is a gamer, geek and gremlin hunter with a passion for cyber security and smashing Windows bugs before they bite. She’s IBM-certified, loves real freeware, despises bloatware, and powers most of her troubleshooting with an unhealthy amount of coffee. |
comments powered by Disqus
