


How To Permanently Delete Files Without Sending Them to the Recycle Bin in Windows 11
By selma čitakovićon 02/22/2026 |
Want to instantly delete all files without moving them to the Recycle Bin first?
By default, all files go to the Recycle Bin before you can permanently remove them from your drive. You can perma-delete specific files by selecting them and pressing Shift + Delete. This is often a good thing, especially if you accidentally delete something you shouldn't have. But you can disable this safety precaution pretty easily if you want to.
I'll show you how below, so read on.
Via Recycle Bin Properties
You can change settings directly in the Recycle Bin properties for specific drives and the current user. This method works the same in Windows 10.
Here's how:
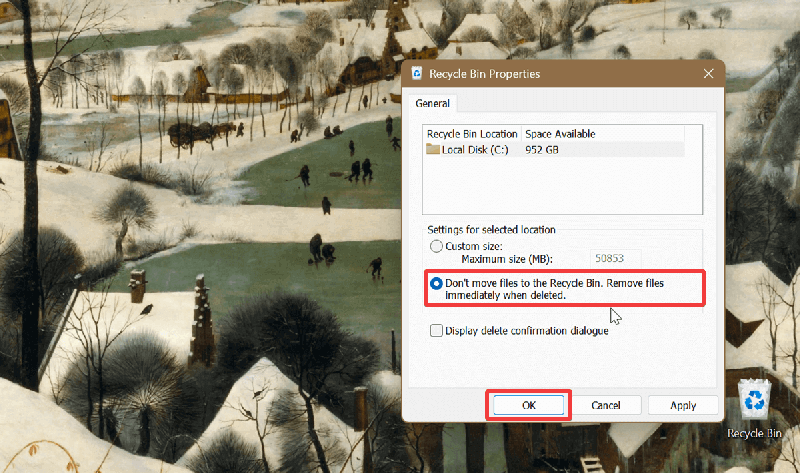
- Right-click the Recycle Bin on your desktop and select Properties.
- Select your target drive under Recycle Bin Location. If you have multiple drives, each one will have its own Recycle Bin and associated settings.
- Select Don't move files to the Recycle Bin. Remove files immediately when deleted.
- Click OK.
Custom size is the default setting. Select it and click OK to undo these changes.
Via Local Group Policy Editor
If you want to configure it so that all users and drives permanently delete files, use the Local Group Policy Editor. It's only available in the Pro, Enterprise, and Education editions, though. Also, you'll have to sign in as an administrator to be able to use it.
Here are the steps:
- Press Win + R, type gpedit.msc, and press Enter.
- On the left side, navigate to User Configuration > Administrative Templates > Windows Components > File Explorer.
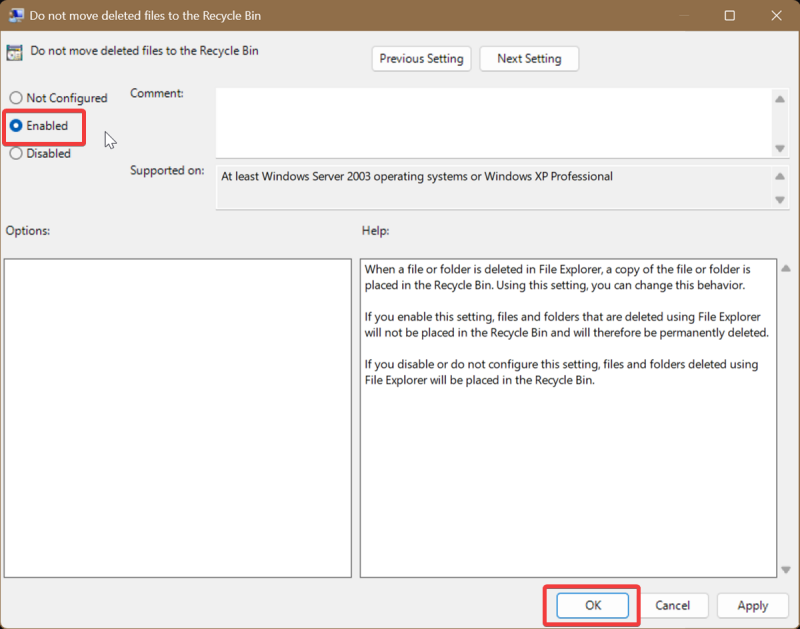
- While in the File Explorer subfolder, scroll down and double-click Do not move deleted files to the Recycle Bin on the right side.
- In the window that opens, select Enabled and click OK.
However, since this setting applies to all users and drives, it will overrule the other options covered in the guide. You'll have to disable it to be able to make changes to specific drives again.
Simply select Not Configured and hit OK after double-clicking Do not move deleted files to the Recycle Bin. That's the default setting for this policy.
Via Registry Editor
Alternatively, you can target specific drives with the Registry Editor and make them perma-delete files.
But first, we'll take a quick detour to PowerShel. You'll soon see why:
- Type PowerShell in Windows Search, and select Open.
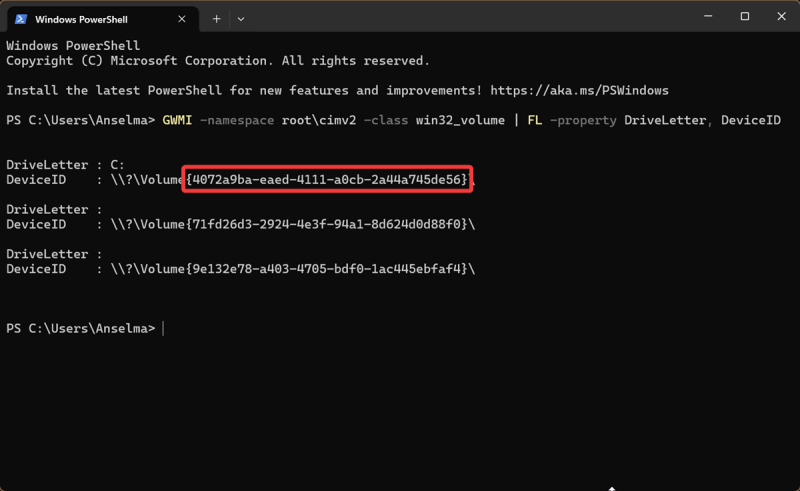
- Type the following command and hit Enter: GWMI -namespace root\cimv2 -class win32_volume | FL -property DriveLetter, DeviceID
This will display a list of drives, together with their Device ID. What you'll need to note is the Volume GUID - a string of letters and numbers in curly brackets. For example: {4072a9ba-eaed-4111-a0cb-2a44a745de56}. Pay attention to the string next to the drive letter that you want to configure. In my case, it's C:.
You can keep PowerShell open so you can easily find what you'll need. Now, let's move on to the Registry Editor:
- Press Win + R, type regedit, and press Enter.
- Navigate to: Computer\HKEY_CURRENT_USER\Software\Microsoft\Windows\CurrentVersion\Explorer\BitBucket\Volume\. You can copy this and paste it into the address bar at the top.
- Under the Volume key on the left, there should be several subfolders with long names in curly brackets. Find the specific Volume GUID you singled out earlier in PowerShell, and open the subfolder.
- Double-click NukeOnDelete on the right side.
- Type 1 in the Value data field and click OK.

This will, as the value name suggests, "nuke" files as soon as you click on Delete. If you want to undo this change, just type 0 instead and then click OK.
Additionally, you can disable the delete confirmation prompt if you feel like tweaking the Recycle Bin further.

|
selma citakovic
Selma is a gamer, geek and gremlin hunter with a passion for cyber security and smashing Windows bugs before they bite. She’s IBM-certified, loves real freeware, despises bloatware, and powers most of her troubleshooting with an unhealthy amount of coffee. |
comments powered by Disqus
