


3 Ways To Stop Sending Diagnostic Data
By selma čitakovićon 05/03/2026 |
![{$insert['content_title']](/content/file/5964_image3.png
)
As you know, Microsoft keeps tabs on your device performance and usage, your settings, and other juicy details. It relies on "required" and "optional" data to keep Windows up-to-date and your device running reliably. So, what's the difference between the two?
Required diagnostic data includes basic error information, device information (its settings, specs, installed apps, and drivers), update logs, and upgrade failures. Optional diagnostics, on the other hand, go even deeper, including the websites you browse, your device's memory state during a crash, app activity, battery life, enhanced error reports, and more.
If you don't like the sound of that, you can stop sending diagnostic data - or at least try to, since Windows 11 really doesn't make it easy! I've noticed that it sometimes reverts the changes after updates. Still, here's what you can do to keep your PC more private.
Before following this guide, make sure you sign in as an administrator first.
Via Settings
The easiest way to disable diagnostics is also the most limited, which is unsurprising. You can stop sending only optional data using the Settings:
- Go to Settings > Privacy & security > Diagnostics & feedback.
- Toggle off Send optional diagnostic data.
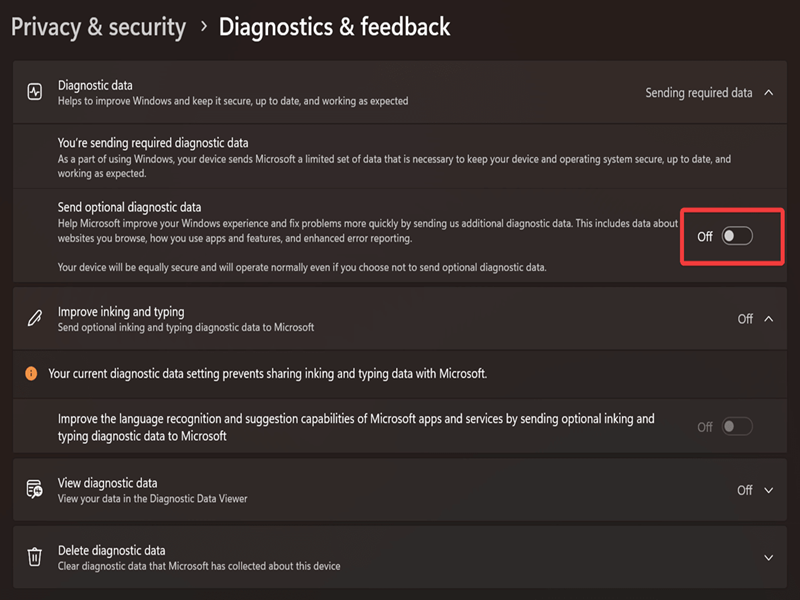
This will also disable Improve inking and typing right under it, since the feature depends on optional diagnostic data.
Via Local Group Policy Editor
If you want to stop sending both required and optional data, you can use the Local Group Policy Editor. However, this tool is only available to Windows Pro, Education, and Enterprise editions. You can try the third method if you're a Home edition user.
Here are the steps:
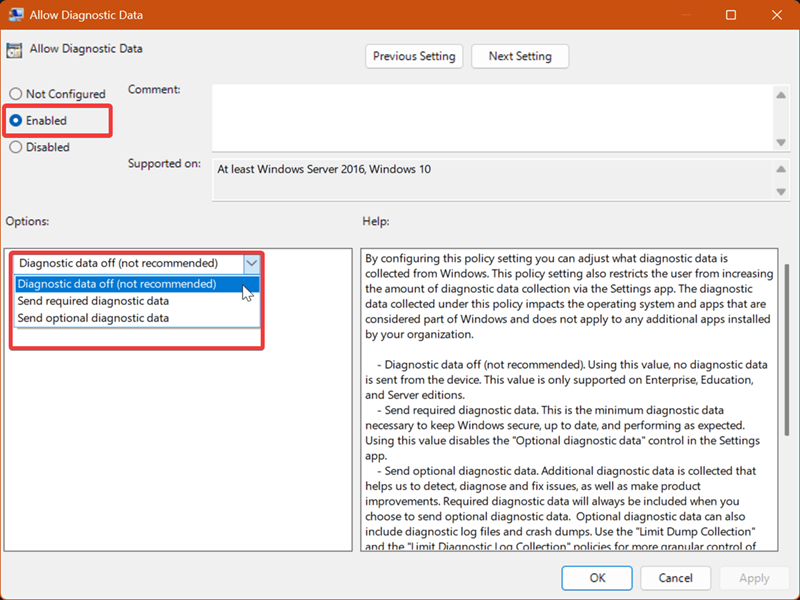
- Press Win + R, type gpedit.msc, and hit Enter.
- Go to Computer Configuration>Administrative Templates>Windows Components>Data Collection and Preview Builds on the left side.
- While you're in the Data Collection and Preview Builds folder, double-click Allow Diagnostic Data on the right.
- Click Enabled, and then under Options, you can choose Diagnostic data off (to disable everything), Send required diagnostic data, or Send optional diagnostic data.
- Hit OK and close the editor. To undo this change, select Not configured in the policy window and click on OK.
However, if you read the policy's fine print, you'll notice this interesting detail in the description for Diagnostic data off: "This value is only supported on Enterprise, Education, and Server editions."
That means that Pro edition users (like me!) shouldn't be able to apply it. Still, I tried, and when I went to check the same diagnostics settings from the first method, it looked like it actually worked. Instead of "Sending required data", it now says "Off."
NOTE: If you do not have Group Policy Editor available, read How To Enable Group Policy Editor to get that going for you.

So, it worked for me, or at least it works for now - until the next update enables it again, hah. I suggest you try it as well, and if you're not as lucky, proceed to the next step.
Via Registry Editor
Lastly, you can specify in the registry to stop sending all diagnostic data or only some. If you're worried about making a mistake, you can create a system restore point and revert your computer to a previous, stable version. Still, this edit is generally safe and shouldn't introduce problems, as long as you follow the steps:
- Press Win + R, type regedit, and press Enter.
- Go to Computer\HKEY_LOCAL_MACHINE\SOFTWARE\Policies\Microsoft\Windows\DataCollection. You can paste this in the address bar at the top.
- While in DataCollection, look for a DWORD value called AllowTelemetry. If it doesn't exist, right-click an empty spot and select New > DWORD (32-bit) Value. Name it AllowTelemetry.
- Double-click it and type 0 in the Value data field to disable all diagnostic data. Click OK.
- Alternatively, to send only the required data, type 1 and hit OK. To send optional data, type 3.
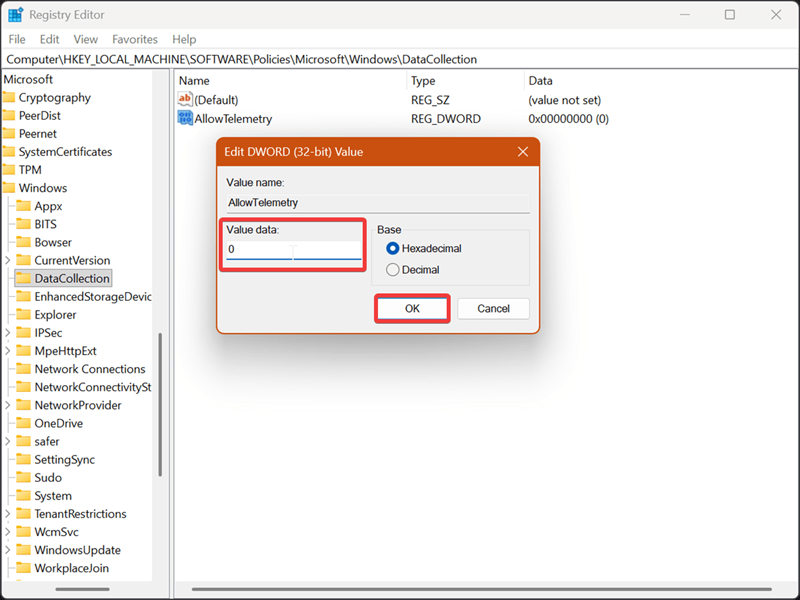
To undo it, right-click AllowTelemetry and select Delete.
As you can see, it takes some effort to evade Microsoft's spying attempts! Hopefully, these tips will work for you (and stay that way).

|
selma citakovic
Selma is a gamer, geek and gremlin hunter with a passion for cyber security and smashing Windows bugs before they bite. She’s IBM-certified, loves real freeware, despises bloatware, and powers most of her troubleshooting with an unhealthy amount of coffee. |
comments powered by Disqus
